Sculpture Starter Kit Calculator
Choose Your Sculpting Material
Air-Dry Clay
Most beginner-friendly option
- - No kiln needed
- - Easy to fix mistakes
- - Great for small projects
Soapstone
Soft stone for carving
- - Carve with butter knife
- - Holds fine detail
- - Permanent result
Wood
For sturdy, organic forms
- - Use basswood for easy cutting
- - Great for small sculptures
- - Requires basic cutting tools
Found Objects
Creative abstract forms
- - Recycled materials
- - Requires wire and pliers
- - Best for small-scale pieces
Essential Tools
Estimated Time & Cost
Pro Tip: Your hands are your most important tool. Start by feeling the material and shaping with your fingers. Sculpting isn't about perfect replication—it's about capturing the feeling of something real.
Starting a sculpture doesn’t require a degree in fine arts or a studio full of expensive equipment. It starts with a thought, a hand, and something you can shape. Maybe you’ve seen a piece in a park or a museum and wondered how someone turned a block of stone or a lump of clay into something alive. The truth is, most sculptors didn’t start with marble or bronze. They started with playdough, wet sand, or a chunk of foam. You can too.
Choose Your Material
The first real decision isn’t about style or technique-it’s about what you’re going to make it from. Different materials behave differently, and your choice will shape your whole process.
- Clay is the most forgiving and popular for beginners. Air-dry clay doesn’t need a kiln. Polymer clay can be baked in a home oven. Both let you build, carve, and smooth without special tools. It’s the closest thing to sculpting with your fingers.
- Soapstone is soft enough to carve with a butter knife. It’s dense, cool to the touch, and holds fine detail. Many artists start here because it doesn’t crumble like chalk or require heavy tools.
- Wood works if you want something sturdy and organic. Basswood is easy to cut with a pocket knife. Avoid hardwoods like oak until you’ve practiced.
- Wire and found objects are great for abstract forms. Old coat hangers, driftwood, or scrap metal can become expressive figures with just pliers and patience.
Most beginners pick clay. It’s cheap, easy to fix, and lets you see results fast. If you’re unsure, try a small block of air-dry clay from a craft store. You don’t need to commit to a big project right away.
Start Small
One of the biggest mistakes new sculptors make is trying to make a full human figure on their first try. That’s like learning to paint by copying the Mona Lisa on your first brushstroke.
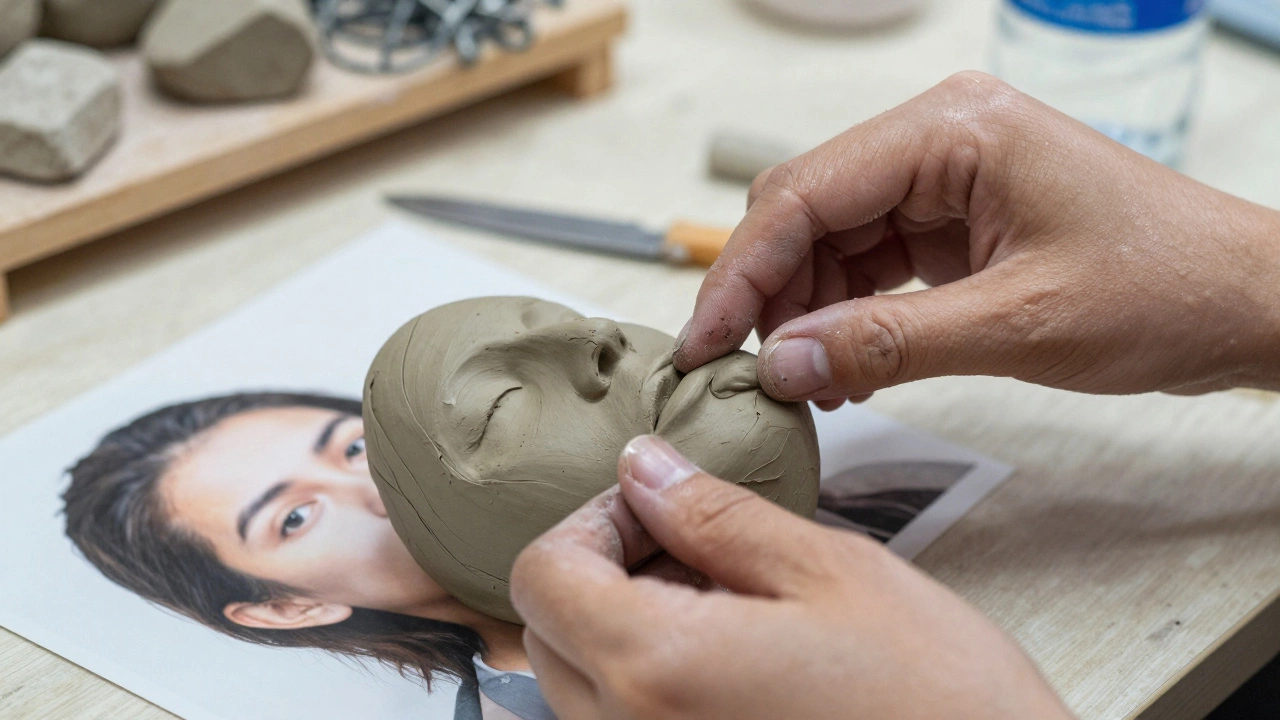
Start with something simple: a bird, a hand, a face, or even a blob that looks like it’s moving. Focus on one part. A single hand can teach you more about proportion, tension, and texture than a whole body ever could.
Use a reference. Take a photo of your own hand, or find a clear image online. Don’t copy it exactly-use it to understand how fingers bend, how knuckles stick out, how skin folds. Sculpting isn’t about perfect replication. It’s about capturing the feeling of something real.
Tools You Actually Need
You don’t need a full sculpting kit. Here’s what works:
- A wooden skewer or pencil for poking and shaping
- A plastic knife or old butter knife for cutting and smoothing
- Water and a small brush for softening clay
- Sandpaper (120-220 grit) for finishing
- A rolling pin or bottle to flatten clay
That’s it. No expensive chisels, no power tools. Your hands are your most important tool. Use them to feel the material. Press, pinch, roll, scrape. The texture you create with your fingers is what gives sculpture its soul.
Build from the Inside Out
Most sculptures, even big ones, start with a core. Think of it like building a skeleton before adding muscle and skin.
If you’re using clay, roll a ball or a tube to form the basic shape. For a head, start with a sphere. For a standing figure, make a vertical rod for the spine, then add rounded lumps for the chest and hips. Don’t worry about details yet. Just get the weight and balance right.
Once you have the basic form, you can add layers. This is where you start shaping the arms, legs, and facial features. Keep stepping back. Look at it from all sides. Sculpture is three-dimensional, so your view changes as you move around it.
Work in Stages
Don’t try to finish everything at once. Sculpting is a process of adding, removing, and refining.
- Block-in: Get the general shape. Rough out the form with big movements.
- Refine: Add details. Define edges, curves, and textures.
- Smooth: Wet your fingers or brush and gently glide over surfaces to soften transitions.
- Finish: Let it dry or bake, then sand lightly if needed. You can leave it raw, paint it, or seal it with clear varnish.
Each stage takes time. A small sculpture might take two or three sessions. That’s okay. Sculpting isn’t a race. It’s a conversation between you and the material.
Don’t Fear Mistakes
Clay can be reshaped. Wood can be carved again. Even stone can be smoothed down. If you mess up, you’re not failing-you’re learning.
I once spent three hours shaping a face that looked like a potato. I was frustrated. So I squashed it flat, rolled it into a ball, and started over. The next day, I made a small owl. It wasn’t perfect. But it had character. That’s what matters.
Every great sculptor has a drawer full of failed pieces. Don’t throw yours away. Keep them. Look at them later. You’ll see how far you’ve come.
Find Inspiration Without Copying
Look at sculpture-not to copy, but to understand. Visit a local museum or browse online collections. Pay attention to how the artist handled weight, movement, and emotion.
- Auguste Rodin’s The Thinker isn’t about perfect anatomy-it’s about tension in the muscles, the curve of the back, the weight of thought.
- Barbara Hepworth’s abstract forms feel like they’re breathing. She carved into stone as if it were alive.
- Contemporary artists like Rachel Whiteread use negative space. Her casts of empty rooms make you feel the absence of people.
You don’t need to make something like them. But seeing how others solved problems-how they made stone feel soft, or metal feel heavy-gives you ideas you can turn into your own.
Let It Be Imperfect
The first sculpture you finish won’t be gallery-ready. It might be lopsided. The fingers might be too long. The face might look confused. That’s fine.
What matters is that you made something from nothing. That you took an idea, held it in your hands, and gave it form. That’s the magic of sculpture. It doesn’t need to be perfect. It just needs to be real.
Keep making. Try a new material next time. Try a bigger piece. Try working outside. Sculpture doesn’t live only in studios. It lives in parks, on sidewalks, in people’s homes. Your next piece might be the one someone stops to look at.
What Comes Next
Once you’ve made a few small pieces, you might want to try:
- Working with plaster to make molds
- Using wire armatures for larger figures
- Experimenting with mixed media-combining clay with fabric or metal
- Joining a local sculpture class or art group
But don’t rush. The best sculptors aren’t the ones with the fanciest tools. They’re the ones who kept showing up, even when their work didn’t look like what they imagined.
Start small. Stay curious. Let your hands lead. And remember: every sculpture begins with a single touch.
Do I need to know how to draw to start sculpting?
No. Drawing helps with understanding form, but it’s not required. Many sculptors work directly with their hands, using photos or real objects as references. You can learn to see shapes and volumes just by handling clay and observing how light hits curves and edges.
What’s the cheapest way to start sculpting?
Buy a 2-pound block of air-dry clay for under $10 and use household items like butter knives, toothpicks, and water. You don’t need to spend money on tools right away. Your fingers are the best sculpting tool you already own.
Can I sculpt without a kiln?
Yes. Air-dry clay and polymer clay don’t need a kiln. Air-dry clay hardens in a few days. Polymer clay can be baked in a regular oven at 275°F for 15-30 minutes. You only need a kiln if you’re working with ceramic clay that needs high-temperature firing.
How long does it take to make a sculpture?
It depends on size and complexity. A small hand or animal can take 2-4 hours spread over a couple of days. A larger piece might take weeks. The key isn’t speed-it’s consistency. Even 20 minutes a day adds up.
What if my sculpture cracks or breaks?
Cracks happen, especially with air-dry clay if it dries too fast. To prevent this, cover your work with a damp cloth when not working. If it breaks, you can often repair it with a bit of wet clay and gentle smoothing. It’s part of the process. Don’t see it as failure-see it as a lesson.