Landscape Composition Planner
There is nothing quite like standing before a blank canvas with the wind in your hair and the mountains stretching out behind you. But then comes the panic. You look at the view, you look at your brush, and suddenly the grandeur of nature feels impossible to capture. You want to paint that golden hour light hitting the pine trees, but what ends up on the canvas looks flat, muddy, or just... wrong.
You are not alone. Every painter, from the old masters to modern digital artists, has faced this exact moment of doubt. The gap between seeing a landscape and translating it into two dimensions is wide. However, closing that gap doesn't require magic; it requires a system. By breaking down the process into manageable steps-observation, sketching, blocking, and refining-you can turn any scene into a compelling landscape painting.
The Art of Seeing: Observing Before Painting
Most beginners make the same mistake: they start mixing paint before they have truly looked at the subject. They see a tree and think "green." They see the sky and think "blue." Nature rarely works in such simple terms. To create a convincing landscape, you must first learn to see values and relationships rather than isolated objects.
When you stand before your scene, squint your eyes. This simple trick blurs the details and forces your brain to focus on the big shapes and the contrast between light and shadow. Notice how the distant mountains fade into a cool, hazy blue while the foreground rocks pop with warm, sharp edges. This phenomenon is known as atmospheric perspective, and it is the secret ingredient to creating depth in your work.
- Identify the Light Source: Where is the sun? Is it harsh and direct, creating deep shadows, or soft and diffused through clouds?
- Map the Values: Divide the scene into three main value groups: lights, mid-tones, and darks. Ignore colors for now.
- Find the Focal Point: What draws your eye first? A lone tree? A winding river? Decide where you want the viewer’s attention to land.
Take a moment to sketch these observations in a small notebook. Don't worry about making it pretty; just record the shapes and values. This thumbnail sketch will serve as your roadmap, saving you from costly mistakes later when you are trying to fix a horizon line that is crooked by an inch.
Gathering Your Tools: Materials for Success
You don't need the most expensive supplies to start, but having the right tools makes the process smoother. If you are working outdoors, often called plein air painting, portability and durability are key. If you are working from photos or memory in a studio, you have more flexibility.
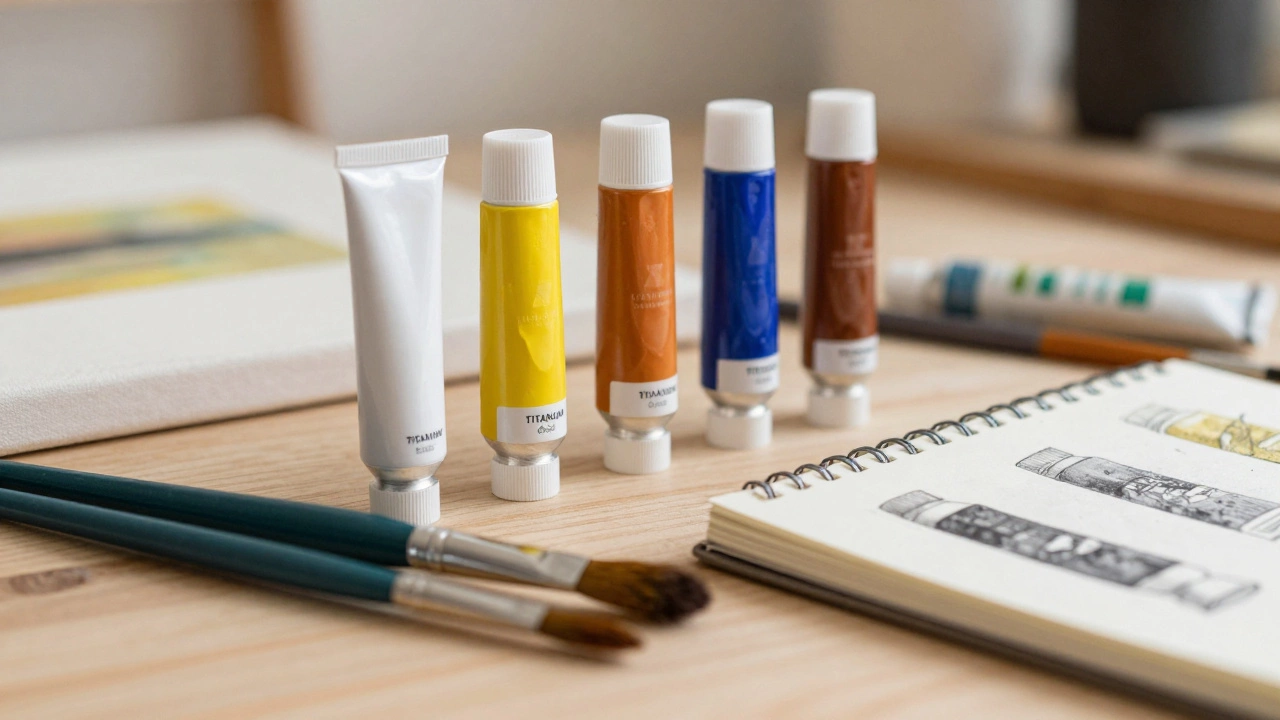
For oil painters, a limited palette is often better than a full box of tubes. Limiting yourself to five or six colors helps maintain harmony in the painting. A classic landscape palette might include Titanium White, Cadmium Yellow Light, Cadmium Red Medium, Ultramarine Blue, Burnt Sienna, and Ivory Black. With these, you can mix almost every natural hue you encounter.
If you prefer watercolors, the transparency of the medium allows you to build layers of luminosity. Start with a cold-press paper, which has enough texture to hold the pigment without buckling too much. Acrylics offer a happy medium, drying quickly and allowing for both opaque layering and transparent glazing, depending on how much water you add.
| Medium | Drying Time | Best For | Difficulty Level |
|---|---|---|---|
| Oil Paint | Slow (days to weeks) | Blending, rich textures, outdoor light | Moderate |
| Watercolor | Fast (minutes) | Transparency, skies, spontaneous effects | High |
| Acrylic | Medium (hours) | Versatility, quick fixes, impasto | Low to Moderate |
Composition: Building the Skeleton
A beautiful color scheme cannot save a weak composition. Composition is the arrangement of visual elements within the frame. It guides the viewer’s eye through the painting and creates a sense of balance. Without a strong structure, even the most accurate details will feel chaotic.
One of the most reliable rules is the Rule of Thirds. Imagine dividing your canvas into a grid of nine equal squares. Place your horizon line along one of the horizontal lines, not in the dead center. If the sky is dramatic, place the horizon in the lower third. If the foreground is interesting, push the horizon to the upper third. This asymmetry creates tension and interest.
Use leading lines to draw the viewer into the scene. A winding path, a river, or a row of trees can act as arrows pointing toward your focal point. Avoid placing your main subject directly in the center unless you are aiming for a specific, symmetrical effect. Instead, offset it slightly to create a more dynamic image.
Consider the shape language as well. Triangles suggest stability and strength, perfect for mountains. Curves suggest movement and flow, ideal for rivers and clouds. Mix these shapes to keep the eye engaged. If everything is round, the painting feels soft and dreamy. If everything is angular, it feels harsh and aggressive. Balance is key.
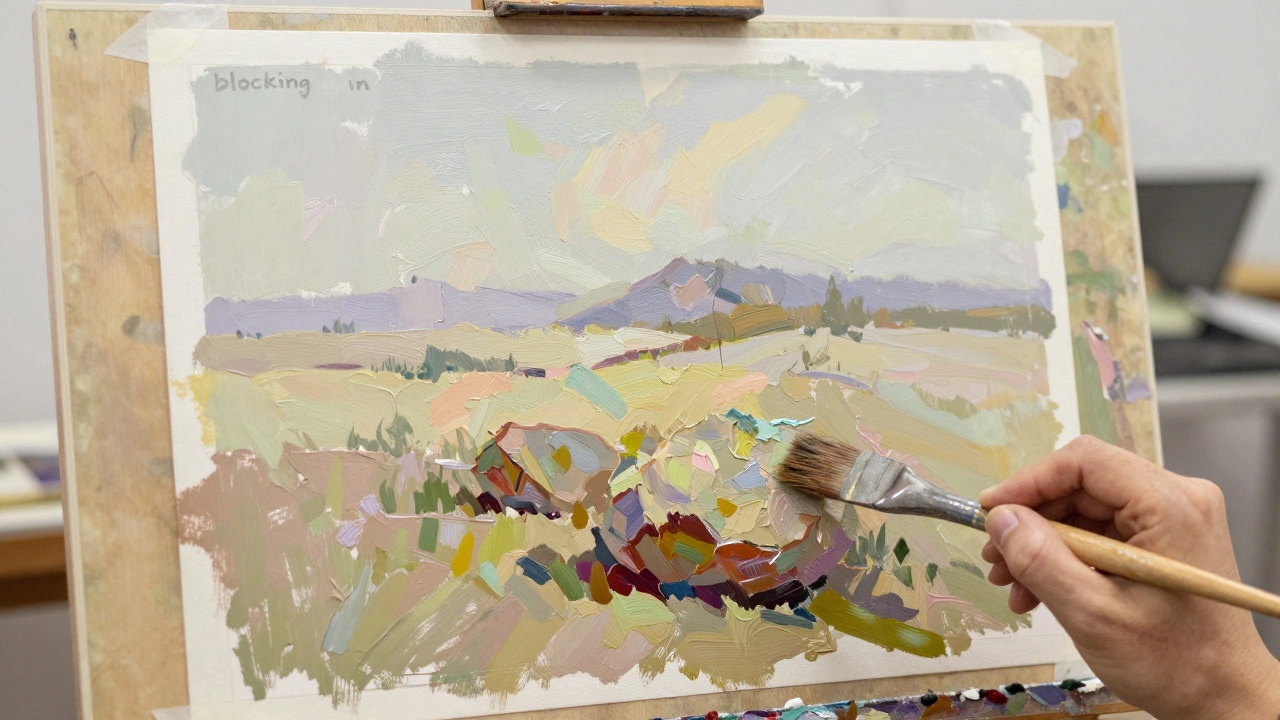
Blocking In: Laying the Foundation
Now it is time to touch the canvas. Resist the urge to start with fine details. Instead, block in the large shapes using thin, loose paint. This stage is about getting the proportions and values correct. Think of it as building the foundation of a house; if the foundation is crooked, the walls will collapse.
Start with the sky. In landscape painting, the sky sets the mood and the lighting for the entire piece. Mix your sky colors carefully, noting how the hue shifts from the zenith (top) to the horizon. Apply the paint broadly, leaving no white canvas showing. Once the sky is down, move to the middle ground, then the foreground.
Keep your brushes clean and your strokes confident. At this stage, accuracy matters more than beauty. If a tree is too tall, scrape it off or paint over it. It is much easier to fix a mistake in the early stages than after you have spent hours detailing leaves. Use a large brush to cover ground quickly, establishing the general masses of color and value.
Refining Details: Adding Life and Texture
With the big shapes in place, you can begin to add detail. This is where the personality of your landscape emerges. Focus your energy on the focal point. This area should have the highest contrast and the sharpest edges. As you move away from the focal point, soften your edges and reduce the contrast. This technique mimics how our eyes perceive depth, keeping the viewer focused where you want them to be.
Pay attention to texture. Rocks are rough and jagged; water is smooth and reflective; grass is fine and wispy. Use different brushes and techniques to convey these differences. A stiff bristle brush can create the rugged surface of bark, while a soft sable brush can blend the delicate transition of a sunset sky.
Don't forget the small touches that bring a scene to life. A few birds in the distance, a ripple in the water, or a patch of wildflowers in the foreground can add scale and narrative. These details should enhance the painting, not distract from it. Ask yourself: does this detail serve the whole? If not, leave it out.
Common Pitfalls and How to Avoid Them
Even experienced painters fall into traps. One common issue is muddy colors. This happens when you mix too many pigments together, especially complements like red and green or blue and orange. To avoid this, limit your mixing and use cleaner, brighter hues for highlights. Save the darker, mixed tones for shadows.
Another pitfall is overworking the painting. Sometimes, less is more. If you keep adding layers and details, you risk losing the freshness and spontaneity of the initial blocks. Step back frequently to assess the overall effect. If the painting feels cluttered, simplify. Remove unnecessary details and strengthen the core shapes.
Finally, don't ignore the horizon. A tilted horizon can make a painting feel unbalanced and uneasy. Always check your alignment with a level or by comparing vertical elements in the scene, like trees or buildings. A straight horizon provides a stable anchor for the rest of the composition.
Final Thoughts: Trust Your Eye
Creating a landscape painting is a journey of observation and interpretation. There is no single right way to paint a mountain or a meadow. Your unique perspective is what makes your art valuable. Embrace the mistakes, learn from them, and keep painting. The more you practice, the more naturally these steps will flow, and the closer your paintings will come to capturing the spirit of the places you love.
What is the best medium for beginner landscape painters?
Acrylics are often recommended for beginners because they dry quickly, are easy to clean up, and are forgiving. You can paint over mistakes easily, and they behave similarly to oils once you get used to the faster drying time. Watercolors are challenging due to their permanence, while oils require careful handling of solvents and long drying times.
How do I make my landscape painting look realistic?
Realism comes from accurate values and edges, not just color. Squint at your reference to see the true light and dark patterns. Use atmospheric perspective by making distant objects cooler, lighter, and less detailed. Pay close attention to the focal point, ensuring it has the sharpest edges and highest contrast.
Should I paint from life or from photographs?
Painting from life, or plein air, teaches you to observe light, color, and atmosphere in real-time. It improves your ability to mix colors and compose on the spot. Photographs are useful for reference, especially for complex scenes or bad weather, but they can flatten values and distort perspectives. Ideally, combine both methods.
Why does my sky look flat?
A flat sky usually lacks variation in value and temperature. Skies are rarely a uniform blue. Look for subtle shifts in hue from the top to the horizon. Add warmth near the sun and coolness in the opposite direction. Blend these transitions smoothly to create a sense of depth and volume.
How can I improve my composition skills?
Practice thumbnail sketches. Spend five minutes drawing small, black-and-white versions of your potential compositions. Experiment with placing the horizon, focal points, and leading lines. Study the work of master landscape painters to see how they arranged elements. Analyze what draws your eye in their paintings and apply those principles to your own work.